Friday 22 July 2016

Napoleon's Triumph (Simmons Games) - Game Report

This game report has been reproduced from the original by the kind permission of its author - and local gaming buddy - Roger. In this game, Roger played the French, while I commanded the combined Russian - Austrian army.

Napoleon's Triumph is an innovative block-and-area-movement game, based on the battle of Austerlitz in December, 1805. Thanks to photographer Paul Humphreys, this is how the game looks, in all of its component glory:

Each rod represents a specific infantry, cavalry or artillery formation. The historical commanders - such as Bernadotte in this photo - are also represented. The number of icons on each block denotes unit strength.

Roger owns this game and we played a couple of face-to-face games, before progressing to games over Vassal.

Based on this 4th game, I present Roger's report (with some annotations from me, in brackets). As the battle progresses, he cleverly weaves in maxims from Napoleon.


'Gentlemen, examine this ground
carefully, it is going to be a battlefield.'


2nd December 1805 

7AM 


The French make the mistake of splitting the Guards. Cavalry screen the vulnerable French corps. The Allies outnumber them 2:1. 


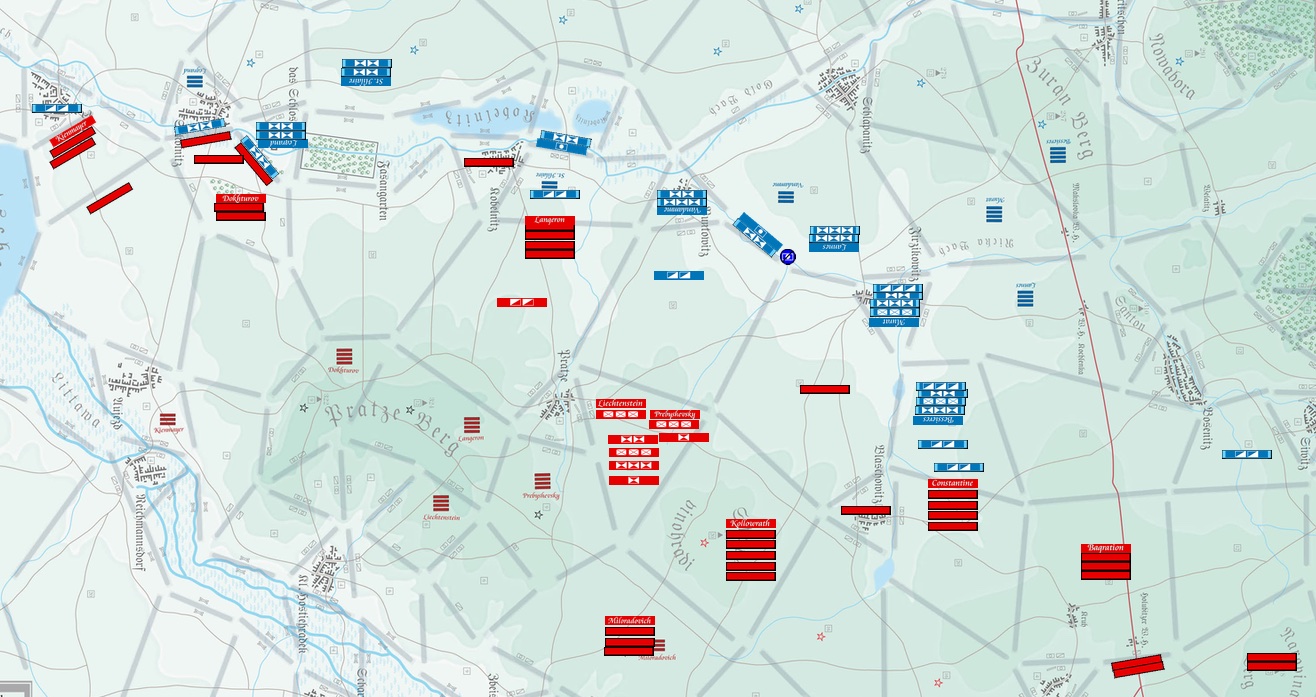
(Click on images to see higher res versions that show more detail. In later images, red and blue dots show you where the action is)

8AM


 https://cf.geekdo-images.com/images/pic1747942.png

The Austrians confidently advance. St Hilaire feigns a retreat from Langeron. Bagration sets a roadblock on the main road. 

9AM


The Austrian columns continue their general advance in the centre. Vandamme is damned for making a rash attack on Prebyshevsky and loses a regiment. 


French morale 21; Allied 27


9:20AM

Liechtenstein reinforces Prebyshevsky. Artillery duel ensues. 
'Artillery is more essential to cavalry than to infantry, because cavalry has no fire for its defense, but depends on the sabre.'
After the artillery softens the opposition, Lannes orders a heavy cavalry charge...

10AM

The cream of the Allied army is soon in disarray. 
'It is the business of cavalry to follow up the victory, and to prevent the beaten army from rallying.'
How did this happen? Roger explains:

At the start of the turn, an Austrian 3-str INF and 1 ART were defending the approach (grey border zone separating areas) opposite a French 2-str INF and 1 ART also in the approach, facing off as it were. The French heavy cavalry were waiting in reserve. The Austrian columns were in reserve and in 'column' - ie not in a defensive formation. 

The French start with an artillery attack which can only be absorbed by the Austrians in the defense approach. This reduces the Austrians to a 1-str INF and 1 ART or 2-str INF no ART. The French 3-str CAV then mounts an attack into the weakened defence approach. The Austrians must defend from the units in the approach, and put up at most a 2-str defence. They lose the fight and must retreat. The Fr heavy CAV then advances into the locale. 

As the Austrian columns in the reserve locale were not expecting an attack, they become dismayed by the routed units from the overwhelmed defence approach, and they too rout. 


Essentially the units in the reserve locale can be thought as being in 'column' formation, surprised by an unexpected attack and panic, particularly as they see the defenders streaming to the rear. 


(My guys in the centre lost cohesion as a result of coming out second best against the French cavalry. This detaches each one of them from their corps - not good, to say the least).

11AM

Bernadotte's sudden appearance on Kienmayer's flank causes a rout. Davout is punctual. 
'A general-in-chief should ask himself several times in the day, 'What if the enemy were to appear now in my front, or on my right, or my left?''
The Allied right is now under serious pressure. 
'The transition from the defensive to the offensive is one of the most delicate operations in war.'
French morale 18; Allied morale 14

1130AM

Constantine orders a fierce barrage. 

'The worse the troops the greater the need of artillery.'

12PM


Murat continues to order probing attacks, while Davout attempts to outflank the Allied position. 

On the French left, Bernadotte waits for Legrand to catch up. The plan is to exploit the Allies' limited commands by putting pressure everywhere. 
'I have destroyed the enemy merely by marches.'


1PM

Kollowrath reinforces the Allied pocket. Davout gambles on an attack but Kollowrath's counterattack throws him back. 
'We should always go before our enemies with confidence, otherwise our apparent uneasiness inspires them with greater boldness.'
Bessieres gets tired of carousing in town and moves off with heavy cavalry to bring pressure to bear on the Allies elsewhere. 

1:30PM


Kollowrath pursues Davout. Prebyshevsky and Liechtenstein continue to bring reinforcements for a counterattack. 

Miloradovich moves to counter Bernadotte. 

2PM

Murat orders a cavalry charge and routs the Allies. Further successful cavalry attacks in the centre and on the French left complete Allied demoralization for a decisive victory! 
'Charges of cavalry are equally useful at the beginning, the middle and the end of a battle. They should be made always, if possible, on the flanks of the infantry, especially when the latter is engaged in front.'
Some rules nuances contributed to the Allied defeat in relation to cavalry penalties/obstructions and being aware of the ability to attack twice through an approach in certain circumstances. Still, great tense fun. 
'Remember , gentlemen, what a Roman emperor said: The corpse of an enemy always smells sweet.' 
--00--

So, I had my head handed to me in that one :-)

Thanks again Roger, for allowing me to reproduce your report. Turning to the subject of books, while I have not yet managed to acquire a copy or read it, David Chandler's massive 1200 page plus 'The Campaigns of Napoleon':


....is often cited as THE single source book for the serious Napoleonic reader. Be prepared to part with quite a lot of cash for this one. It's well overdue to be reprinted!

For my own part, I have read several books on aspects of Napoleon's military career. For those looking for a handy single volume overview - and one written in a very engaging style, with generous illustrations and maps - I can recommend 'The Napoleonic Wars' by Gunther Rothenberg:


This is from the same 'Cassell's History of Warfare' series that I recommended in my earlier entry about the classic WWI game, 'Paths of Glory'.

Friday 15 July 2016

First Bull Run (MMP/The Gamers) Game Report

In June and July, local gaming buddy Roger and I decided to get acquainted with the Civil War Brigades series of games from The Gamers/MMP, by starting - logically enough - with the battle of First Bull Run. The battle is otherwise known as First Manassas.

To ably set the scene, I recommend a spot of period music. This is Richmond is a Hard Road to Travel - set to photographs and performed by the brilliant Bobby Horton:


We played scenario 6.3: First Battle of Bull Run, from the excellent Three Battles of Manassas game.
I played the Union, while Roger took the Confederates.

This map, taken from our Vassal game, shows the situation north and south of Bull Run at nine in the morning of July 21st, 1861:


Commanding the Union, General McDowell had initially sought to turn the Confederate right flank, but discovering it to be heavily defended, he then personally travelled westward (the Union had no cavalry to speak of) to seek an opportunity on the Confederate left. This delayed an already postponed attack, allowing further rebel brigades to arrive. In fact, Beauregard had intended to launch his own surprise attack, further downstream, on the morning of the 21st.

Finding the Sudley Springs Ford unguarded, McDowell hatched a plan to send two Divisions across the Ford and down the Manassas-Sudley Road, while Tyler's 1st Division created a diversionary 'demonstration' near Stone Bridge.

So, as the scenario opens, having already received their orders, my Union troops are beginning to cross Bull Run at Sudley, while Roger is sending Evans and a handful of other CSA Brigades towards Mathews Hill and Dogan's Ridge, north-west of Henry House Hill.

In this game, each turn represents half an hour. Fast-forwarding the game, here is the situation north-west of Henry House Hill, at 10:30am:


The rebels are preparing a reception committee for the advancing US troops, with Bee and Bartow extending their line. 'Shanks' Evans traded fire earlier with the Union vanguard and has staged an emergency retreat, his men already complaining that ammo is running short.

The fighting intensifies as the Federals push on Henry House Hill. This is the situation as the Union prepares to move, an hour later - 11:30am:


Bolstered by artillery, Evans has taken up a defensive position on Henry House Hill. Wade Hampton's finely uniformed 'Legion' (one of the South's richest men, Hampton financed and equipped his own brigade) has arrived and taken up position alongside Evans. Stuart's cavalry (which can act independently, requiring no orders from senior command) guards the road east of the Hill, in case the Union First Division makes a move to cross Stone Bridge.

Bee's boys have just taken a full Union volley and routed down the Sudley Road, before gaining some cohesion (now marked 'DG' - disorganised). Beauregard has arrived too. His presence means that orders can quickly be relayed to troops in his vicinity. But whether they'll be promptly obeyed....or obeyed at all, is up to the dice gods.

During this turn, Hunter's Division continues to cross Young's Branch, and Heintzelman's 3rd Division marches along Sudley Road, soon to add to the push for Henry House Hill.

Meanwhile, over on the Union left, I tried to kick Miles' Division into action by rolling for his initiative. Not an easy thing to do as Miles is rated '0' for command, meaning that only a 12 on two dice would succeed. Well, I succeeded alright.....for the rebels that is, rolling a double one! This delivered a 'loose cannon' result, meaning that instead of me, Roger could order Miles!  He promptly sent Miles' division on a merry goose chase into the forest due east of his position. Such an order applies for one turn.  Looking up the history, I was amused to discover that Miles had been reprimanded for being under the influence of liquor at Bull Run....so this was a great example of game-play mirroring history!

At midday, the battle reaches a new level of ferocity as Union troops storm Henry House Hill, in an attempt to dislodge the Rebs and seize the position before Confederate reinforcements - including Jackson - can arrive. Brigades under Porter and Burnside are locked in close combat with the hard-pressed Rebs under Evans and Hampton. Here is the result, after resolving close combat and completing the Union move:


With the support of his artillery detachment, Evans succeeds in repelling the Union assault. Shaken, Porter's boys retreat one hex. Further along the ridge, it's a better story for the Union. Ramming into Hampton's thin ranks, Burnside's shaken brigade dislodges the Rebels from the crest of the Hill.

For those of you unacquainted with this game system, you may be puzzled by the absence of 'attack' and 'defence' strength values on the counters. One of the cool aspects of Civil War Brigades is that the fire strength and losses taken by brigades is kept secret, with each player keeping records of strengths, casualties and stragglers on their respective Loss Charts.

Back to the battle. The Rebels are now in a precarious position on the Hill....and throw everything they have into a defensive volley.

Pow:  Rebel defenders overlooking the Manassas-Sudley Road lay down a scathing fire, sending Porter's extended line reeling back, disorganised, with some troops fleeing the field. In game terms, I rolled a 62 and 56 for each unit respectively. The first number counts as '10s' - and the higher the number, the worse the result for the defender. Ouch.

Pow: Hampton's ragged ranks only manage a morale check on Burnside's victorious brigade on the crest of Henry House Hill. I'm relieved, then roll for morale. It's a:

66!

That's the worst result possible and Burnside's boys erupt in panic and rout!! Victory is cruelly snatched from their grasp and it's an ugly spectacle for the civilians who have travelled from Washington to view the battle. I guess Burnside's boys must have looked sideways and seen Porter's troops skedaddle....and thought it was a damned good idea!

Due to the rout, Burnside can no longer maintain an extended line, so the brigade collapses and runs for the rear, failing a rally roll to send them streaming northward. Little do they know that Stuart's cavalry is waiting for just such an opportunity.

Within the next hour, Burnside's brigade will be completely eliminated, mown down by cavalry volleys in their flank and rear.

While this is happening, I got lucky with McDowell's orders to Tyler's 1st Division being accepted after only a short delay (I rolled a 1 or a 2 on a single die). Tyler is instructed to cross Stone Bridge and join the attack to seize that damned hill! His brigades move out.

Fast forward to 15:00.   Here is the situation on the Hill:


After their first assault is repelled, the arrival of Heintzelman's division - AND Tyler's division from the east - steadies the troops. Beside the Hill, Tyler's boys put increasing pressure on the Rebels, pushing them back and threatening to out-flank their Hill position. Jackson's arrival has shored up Rebel defences at the western end of the Hill, but without more troops, there is little the Confederates can do as the Union pushes further around the Hill.

At least in terms of this game, Jackson and his brigade are not going to have an opportunity to earn their famous 'Stonewall' sobriquet!

Eventually, the writing is on the (stone) wall and Confederate command decides to stage an emergency retreat (allowed when threatened by destruction or being surrounded), taking up positions south of the Hill. Further to the rear, Bee and Evans lick their wounds and recover stragglers.

While this is happening, fighting has broken out to the east - namely between Miles' division and a handful of CSA brigades under the command of Joseph E Johnston. After some delay, Miles had finally accepted my orders to advance down the Centerville Road so as to deter the Rebs from sending further forces to assist Beauregard. However, realising the poor quality of both commander and the bulk of his troops, I made it clear that should they face resistance from the enemy, then they were to adopt a defensive stance aimed at preventing the Confederates from moving northward.

At this time, Johnston's brigades have accepted his orders to attack northward, so the two forces are now clashing just north of Blackburn's Ford.

By 1830, this is how the battle has progressed:


By this time, the Union has consolidated its position on Henry House Hill. Most of the brigades are pretty beat up. Their original orders to take the Hill have been fulfilled, so they have gone on the defensive and set about recovering stragglers and distributing ammo. However, to keep the Rebs on the hop, I ordered Hunter's division to head west to Groveton, then swing south, along Lewis Lane and Compton's Lane, so as to threaten New Market from the west (black arrows, above).

Further east, the Confederates have succeeded in routing one of Miles' brigades and pushing his division northward, though at some cost to themselves.

With evening gathering, a zealous Hunter sends in Porter's relatively fresh (but small) brigade against Ewell's extended line, his boys charging to engage the grey ranks in close combat. Yet, the Rebs prevail, sending Porter's boys reeling back. Ewell's men follow up with musket and cannon fire, wiping out Porter's gallant brigade. Severely chastened, Hunter beats an emergency retreat.

The game draws to a close at 20:00. The Union is awarded VPs for holding Stone Bridge and Henry House Hill. After taking mutual casualties (points awarded for wrecked brigades) and occupying strategic objectives into account, the final result is a victory for the Union. Huzzah!

A great first game in our exploration of the Civil War Brigade series. On to Richmond!!! Ah, well...not quite yet....On to Second Bull Run!!

Saturday 9 July 2016

MY CURRENT TOP 5 WARGAMES - #1

#1 MARIA (2009)

This atmospheric photo produced by Cornelius Rosenkrantz
Maria is a rarity in the wargaming world....a 3-player game. Even rarer, it's also one that works wonderfully. Brought to you by Histogame and designed by Richard Sivel, Maria is a companion to the company's earlier popular release, Friedrich. Set during the Austrian War of Succession in the 18th Century, Maria is a tangled web of competing European powers, including Austria, Prussia, France, Bavaria, and a banding together of England, Hannover and the Netherlands to form the Pragmatic Army (surely one of the most eccentric titles ever given to an army in military history).

How are all of these competing interests distilled into a three player game? The designer brilliantly attends to this by one player controlling France & Bavaria, the second handling Austria and the third playing both Prussia and the Pragmatic Army.

But wait, those of you who know the history of this conflict are entitled to ask 'how come the same player handles Austria's enemy - Prussia - and its ally, the Prags?'  On this score, you can relax - the game functions perfectly well under this arrangement, largely due to the map being split into two regions, resulting in the French and Prags duking it out in the West, and the French, Austrians and Prussians (and their minor allies) on the march in the east.

So what's so great about this title? Without going into too much detail, the design, play experience and components are all outstanding. At little more than 10 pages, the rulebook won't give you palpitations. A game can be played out in a single afternoon. In Maria, thanks to players secretly allocating a certain number of available armies to each general, you don't know your opponent's strength until you start a battle. Movement is point-to-point along roads linking towns and cities.

Here's a Vassal screenshot by Steve Bishop, of a Prussian player's troop allocation sheet - kept hidden from other players:


Another clever aspect to the game is that - as with Friedrich - the map is overlaid with a grid in which each square is coded according to a playing card suit - hearts, diamonds, clubs or spades. Once battle is joined, whatever suit your army occupies determines what cards you can play from your hand. Reserve cards act as wilds, representing any suit. What then develops is a poker-like duel between you and your adversary. Whoever is defeated or chooses to cut their losses and withdraw, then has to face the consequences: retreating and losing troop points.

The standard of the map, playing pieces and cards are all top-notch. The cards deserve special mention: they are simply wonderful to look at, gorgeously evoking the period:

Photo by William Hunt

What I have described so far covers the gist of the introductory game. In a departure from Friedrich, the Expert Game adds rules and cards that account for the political intrigue that was such a significant part of the conflict. Through the exercise of various political factors - mainly by successfully bidding for political cards that come into play each turn - players can use these cards to do things like shift markers left or right along political tracks that either favour themselves or penalise their opponents, provide troop reinforcements, or force the evil Prussians to withdraw a general and his army from the map, to attend to those pesky Russians (ok, I admit to a bit of bias there!). Winning battles also conveys political advantages, awarding prestige/victory points. At one point, an election for Holy Roman Emperor comes up. Controlling specific fortresses at the time of voting can deliver a distinct advantage in the election.

I've played Maria about 4 times now (twice using the Expert Rules) and found there is much to admire and enjoy in this game. Sadly, I don't yet own a physical copy of the game, but hope to attend to that deficiency in the future. In the meantime, I look forward to my next game.

Regarding book titles, I have not yet read anything dedicated to the War of Succession, so have no recommendations to offer for this one. Someone more in the know may like to put forward a suggestion!


Friday 8 July 2016

MY CURRENT TOP 5 WARGAMES - #2

#2 PATHS OF GLORY (1999)


A standard opening move for the Central Powers:
Liege falls and the German Army pours westward in the Guns of August

Before commenting on this illustrious title, just a reminder that this list is not a consecutive count-down of my favourite games. Instead, these are five games that currently sit at the top of my 'appreciation' list. To me, all deliver a satisfying blend of depth of play, historicity, quality components and fun! They also repay repeated play (if you get a chance, which is a challenge in itself in this hobby, though Vassal certainly helps!).

So, Paths of Glory (PoG) - a grand strategic, card-driven duel between the Allies and Central Powers of the First World War. Designed by Ted Raicer, this was one of the early CDG designs and given the fact that it is now into its 3rd or 4th Edition and remains a favourite at gaming tournaments, has stood the test of time. PoG deserves a place in every serious wargamer's collection, and what better time to achieve that, but when the centenary of WWI events are still being commemorated around the world?

Like any CDG, PoG rewards replay as this builds your awareness of the cards and strategies associated with how best to employ them, and when. I am not going to pretend to have any particular expertise to offer on strategic game play in PoG. I don't. Instead, I am still a traveller embarking on an absorbing and fascinating journey into the world of hard decisions and strategic agony that is PoG. Each card has multiple capabilities, but which to choose? Shall I use its 'ops' value to plug a gap in the line or ready for an attack? Move and attack....? Forget it....this is WWI and it takes TIME to prepare many of your offensives. Shall I play a reinforcement card, knowing that this hands the initiative to my opponent? Will I use that high value card for replacements, but leave my line open to exploitation in the process? Do I exercise that high-ops value event NOW? On the one hand, this one has an asterisk and will leave the game, robbing me of those ops into the future. But on the other hand, not playing it will prevent me from progressing to the 'Limited War' deck to gain an edge on my opponent.

Gnhhhhhhhhhhhhhhhh......that's the sound of my brain burning, and such is the engrossing power and attraction of PoG!

After quite a long hiatus, I recently returned to PoG and have played several games, all of which found some kind of game winning/losing resolution - or simply ran out of time on my table - before reaching the 'Total War' deck. I'll get there one day!

My recommended book companion for PoG is:

The First World War by Australian historians, Robin Prior and Trevor Wilson is a handy overview of the entire conflict, crammed with illustrations and thoughtfully drawn maps. There is a useful chronology at the front and each chapter covers a single year of the conflict.


Thursday 7 July 2016

MY CURRENT TOP 5 WARGAMES - #3

#3 WASHINGTON'S WAR 2010 


A great photo from Margin of Victory
This is the first CDG (card driven game) on my list, and I have to say that it's currently my all time favourite game. As a gamer, I seem to oscillate between traditional hex and counter games and CDG-style games, which generally involve area or point-to-point movement. After a bout of one type of game, I generally get a hankering for the other. Re CDGs, I enjoy the interplay of either playing cards for their events, or (usually) for their 'Ops' (operations point) values. At their best, these games are immersive in the way they're able to communicate historical 'layers' that relate to the conflict in question. Cards often reflect events, individuals of influence (such as commanders) and battle tactics or methods of the period.

Back in 2013, my local gaming buddy Roger and I decided to tackle the problem of getting games to the table, by using Vassal to either play games that we already own, or road test games of interest to us. Since then, we've been keeping a record of our games as a Geeklist on Boardgamegeek (BGG). I'm happy to say that Washington's War was one of our first choices. With an interest in the period and CDGs, I noted just how highly rated this game was on BGG, so suggested we give the game a spin. In the end, we played it 3 times and each contest was a nail-biter that went right down to the line. I enjoyed it so much, that I bought a copy of the game, and now consider myself a fanboy of the game's designer, Mark Herman (just bought a copy of his US Civil War game, For the People...but that's another story).

Focused on the American Revolution, Washington's War (WW) is probably a great gateway CDG, as the ruleset is little more than 20 pages. In usual GMT-style, it's also ably supported by a generously illustrated Playbook, containing an extended example of play. The scale is strategic and the playing pieces represent the commanders on both sides of the War and their armies.

A great feature in WW is that there is uncertainty governing just exactly when the game will end, as drawing a Lord North card can either shorten or extend the War.  The game is asymmetrical, with Patriots and British bringing their own set of strengths and weaknesses to the conflict, as each vies to achieve political and military mastery. The British, for example, have control of the seas and can swiftly land forces into controlled or neutral ports up and down the coast. The Patriots have an easier time in calling up reinforcements, and can stage rapid land marches.

I really can't recommend this game enough. If you are new to gaming and want to give CDGs a try, this is a great starting point.

When getting stuck into a particular game, I like to also read up about the associated history of the conflict. For the American War of Revolution, after some research, I settled on:


The Angel in the Whirlwind by Benson Bobrick is an absorbing single volume history of the War. I would have liked to have seen more maps (I have the paperback version), but if you are seeking a concise, yet expansive, overview of the Revolution, this is a good choice.


Wednesday 6 July 2016

MY CURRENT TOP 5 WARGAMES - #4

#4: THREE BATTLES OF MANASSAS (2004)

An emerging crisis on Henry House Hill as the Federals seek to outflank Jackson

I've always been interested in the American Civil War and dabbled with various gaming systems that attempt to simulate it. What drew me to this title from The Gamers' 'Civil War Brigade' (CWB) series is that this family of games sets out to capture the uncertainty and chaos of command that so plagued warfare of the period. In addition, Manassas is a good starting point as it includes the first major engagement of the War - First Bull Run (July, 1861). Low counter density and a simplified command system reflect the nascent and ad hoc quality of the forces that took part in this early battle. All of this is great for introducing new players to the series.

In contrast to FAB Bulge, Manassas is at the tactical end of the scale. Infantry units represent brigades of various size, with attached artillery units in which a single strength point equates to several guns. In First Bull Run, the Union is organised into divisions, each with its own commander. CSA forces are more loosely organised, and can be activated by their own brigade commanders, or receive instructions directly from their Army Commander (Beauregard or - once he becomes active - Johnston).

In this game, players secretly write their orders down, then hope like hell that they'll be swiftly carried out. The problem is that - just like in the War itself - getting units to obey their orders is fraught with uncertainty. 

A player can either attempt to get subordinate (eg brigade or divisional) leaders  to exercise their own initiative, or they can have their Army Commander (eg McDowell) issue orders. Getting your brigade leaders to use their initiative is good in theory, but in practise you generally have to roll really high to succeed. For the Union, most leaders need a '12' on two dice!  As you would expect, it's somewhat easier for the likes of Thomas Jackson (who would earn his famous 'Stonewall' sobriquet) on the Henry House Hill featured in the above picture) to activate, but still no cake walk.

The more likely method is to have your general issue orders - but of course it takes time for orders to travel to their intended destination, depending on the distance. Each turn in the game is half an hour, so it may take several turns for orders to be received. Then what happens next is determined by rolling the dice. If you are lucky, the orders are accepted immediately. More likely, they will be delayed (ie you need to roll a 1-2, or even a 1 in ensuing turns to get those danged orders accepted). It's also possible that your orders will be rejected!

This system certainly enhances the excitement....and helps to develop a real narrative, an aspect I highly value in games. I'll do a proper game report on this title on another date, but will make the point now that the combat system is excellent, allowing units to extend lines and either close combat or fire on units, resulting in them testing for losses, straggler and completing morale checks. Although generally larger in size, the Union brigades in particular were brittle in this battle, so it generally doesn't take long for them to reach their 'wrecked' limit. In rolling morale on two dice, one die is the '10s', and rolling in the '60s' (double six is 66 for instance) is almost bound to have your brigade rout and run for it!

I'm really enjoying this system and look forward to future scenarios and battles!  Highly recommended.

If, like me, you like to enhance the gaming experience by diving into the history behind the simulation, I highly recommend what is considered one of the finest single volume histories of the American Civil War:


Battle Cry of Freedom by James McPherson is a truly impressive tour de force in telling the story not only of the actual conflict, but in revealing the forces that in the years and decades before the opening salvos at Fort Sumter, made the War all but inevitable. If you are seeking a detailed account of the Battles of Bull Run, then this book is not it, but McPherson's weighty tome is a core reference work for the entire conflict.

MY CURRENT TOP FIVE WARGAMES: #5

Having indulged in this hobby for many years, I have encountered games along the way that have become 'keepers'. This is usually because I've had a terrific time playing them and have come to admire the way they have been designed, together with their re-playability.


So, without further ado.....here they are:


#5: FAB: THE BULGE (2008)


Designed by Rick Young and published by GMT, this is a cracker of a simulation of 1944's Battle of the Bulge. No wargamer's collection can pass muster unless it has at least one Bulge game....and if you are seeking to address that deficiency, you can do much worse than this title. The 'FAB' in the title stands for 'Fast Action Battles'. I think 'Fast' is a little too optimistic as the game system can become quite involved. That said, I found it to be logical and intuitive. The game system just feels right.

I really like the way in which divisional units are represented by blocks, while assets - including artillery, engineers, air support and specialist formations - are represented by counters. Available assets can be allocated to battles (designated by areas) and can influence the outcome. Each turn, a certain number of assets - both returned to available and newly arriving as per the reinforcement chart - are put into a cup and drawn. This means you are never really sure as to what assets will be available. Also included among the assets are replacement and event chits. Many of these allow the player to restore depleted units. Others tie in with historical elements in play during the battle. An example here - available to the Axis player - are the Greif team units that can be used to sow confusion behind Allied lines and stymie Allied attempts to blow bridges.

Here are examples of the available chits, taken from the pre-punched counter sheet:


Each player also has a single Special Action block that can be used each turn to carry out a range of special commands. This block represents direct intervention from your Staff HQ. Among its uses are granting additional replacements, retreating before a combat and conducting a breakthrough combat. While this block can be used once each turn, additional Special Action chits can be drawn from the cup for a single-time use.

A clever aspect of the combat system in this game is that the attacker can choose to abort a battle if the consequences of following through will get ugly. The assets have been spent, but the units can pull back to fight another day. Combat also uses Base Success Numbers (which in this case is 5), which are modified up or down by factors such as defensive terrain, use of armour, troop quality and the type of point unit designated by each side.

Overall, I think this is an excellent operational-level system that lends itself brilliantly to a mobile battle such as the Bulge. The FAB system has so far spawned additional titles, such as FAB: Sicily (which I also own but consider too much of a slug fest to really showcase the FAB system) and FAB: Golan, which has recently been released. I look forward to playing this title.

I highly recommend this game.....and system.

While learning up and playing this game, I also enjoyed reading:


Originally published as The Battle of the Bulge by John Toland in 1959, what this book may lack in the depth of its scholarly analysis, is more than made up for by being an energetic, page-turning history of the battle. I just wish it had decent maps! Perhaps later editions attended to this, as I bought a second-hand copy of the 1998 Wordsworth Military Library edition. One of the most fascinating aspects of the battle that I discovered from reading this book, was the sheer lengths the Germans went to, to disguise their preparations and planning for the 'Wacht am Rhein' offensive.