Showing posts with label World War II. Show all posts

Sunday, 25 February 2018

Wild Blue Yonder: Solo play of a mission from the Rommel Attacks land campaign - Return to Base

NB: if this is your first visit to this series of reports concerning Mission 6, don't read this account now, but scroll down to read the first instalment (3 Turns to Target).


There are now two turns remaining in this mission. All the Axis planes need to do is return to base. If they can do so without taking damage or casualties, the mission will be an outstanding Axis success....and the somewhat hapless British air ace Goodman's tail will be well and truly between his legs.

Here is the situation at the commencement of the first Home-Bound turn:


The lone Goodman faces off against 4 Axis fighters escorting 4 stukas. The two cards at the top right hand side of the photo are a reminder to me that Goodman has a 'veteran' counter, allowing him to play any cards as it if is a barrel roll or tight turn.

#1 Bf110s:  The German leader is feeling frisky. He has a strong hand to help him gain a good attack position on Goodman. In the Wingman Step, an In My Sights (IMS) 3 burst rating card is drawn!  Goodman is copping it already. He is caught unawares by the wingman and is forced to expend his veteran marker. In game turns, an IMS card is discarded, now treated as a barrel roll.  

Now it's the leader's turn. Sensing weakness, the element holds its current altitude. The leader attempts maneuver. No response from Goodman, so the Bf110 is now advantaged over the hurricane. Another maneuver follows, putting the German aircraft on Goodman's tail. Oh oh!  Goodman is in trouble, but as luck would have it, the German leader is unable to get a target fix (ie no burst cards). Draw 2 cards.

Goodman in a pickle

#2 Goodman (Hurricane):
   Goodman has 3 cards:  a half loop, an Out of the Sun (OOS) and an IMS. This could be his last gasp.  As he is now a lone leader, there is no wingman phase. In the Altitude Step, Goodman decides to dive to 'Low' altitude, and draws a barrel roll. Not what he was hoping for.  The German on his tail follows, also drawing a card.

Now Goodman attempts to shake off the German, performing a half loop. No response from the Bf110! The two planes are now in the 'neutral' position. But that is all Goodman can do. He can't close with his foe to use any of his attack cards. Damn. Discard 1, draw 3 (+1 horsepower for being at low altitude).

#3 CR42s: No wingman step as no enemy planes share their current altitude. Recognising an attack opportunity, the Italian leader dives, drawing a card. But he overshoots his target and is unable to bring his guns to bear. In game terms, he does not have any cards that will allow him to close with Goodman, giving him a burst bonus. Possessing a burst rating of zero, the Italian planes must improve their position to have any chance of scoring a hit.  Discard 3, draw 2.

#4 & #5 Stukas: simply hold position and observe their fighters make a meal of the hurricane. Discard 2, draw 2; discard 1, draw 1.

That completes the Turn.


Home-Bound Turn 2 - final Game Turn.

Can the pathetic Goodman (yes, I am joining the chorus of condemnation now too....) live up to his reputation...finally? He only has one opportunity left to him, before the stukas return to base.

#1 Bf110s:  The German wingman targets Goodman and lets loose with a 2B IMS - nice!  Sensing the attack, Goodman evades the stream of bullets with a barrel roll. 

No change of altitude...why would you? The Bf110 leader executes a half loop for a +2 gain in position. But now Goodman literally plays his 'Ace', expending his chit to allow a barrel roll card to be played as an ace pilot. The German can't respond to this, so is unable to tail the hurricane. Drat!
But all is not lost - the German is then able to successfully maneuver, so that he is now advantaged over the hurricane. His guns fail to open fire though....this verdammt Englander keeps evading a target fix!  Discard 2, draw 3.


#2 Goodman: This pesky German won't give him any peace! Only holding 3 cards, Goodman decides to dive, to 'very low'. The ground is rushing by. But the Bf110 follows him down, after discarding then drawing a card. In the Leader Step:

  • Goodman attempts to maneuver. The Bf110 counters with a tight turn.
  • Goodman plays another maneuver. No response from the other aircraft, so position adjusts to neutral. 
  • Goodman now only has 2B cards. One is an engine hit that he has been holding on to for some time, BUT he has just not been able to bring his guns to bear!!
  • Draws 3 cards.  It's a disappointing conclusion to a day be would rather forget.

But it's not over yet. The Italians are hovering overhead, awaiting an opportunity to strike.

#3 CR42s: No wingman action as at different altitude. The Italians dive, drawing a card. The leader is still plagued with a defensive/response hand, so has limited attack potential. He maneuvers successfully, and is now advantaged over the hurricane. This gives him a 1B burst ability, but he has no suitable cards and cannot close on his target. As this is the final time, no point in discarding and drawing cards.....

#4 & #5:  the bombers and their escorts safely land at their base: another successful mission means a round of schnapps in the officers' mess.  The lone and dejected Goodman returns to base, unable to have avenged the death of his wingman...and barely score any hits at all on the enemy. 


OVERALL MISSION RESULT:  

AXIS:
* 5VPs for destroying a hurricane
* 3VP for disrupting ground forces at Tobruk
* 8VP for 4 stukas returning to base undamaged

TOTAL:  16VPS.

ALLIES:  
* zip, zilch, zero......

This concludes Mission 6 of the Rommel Attacks campaign......

Thursday, 15 February 2018

Wild Blue Yonder: Solo play of a mission from the Rommel Attacks land campaign - OVER TARGET

NB: if this is your first visit to this series of reports concerning Mission 6, don't read this account now, but scroll down to read the first instalment (3 Turns to Target).


This is the situation at the beginning of the 'over-target' turn:


A lone hurricane is left to fight it out with 4 Axis fighters, while 4 stukas make their bombing runs.

Zero Hour. The German strike force approaches the defensive perimeter of Tobruk. Hearing the planes, the Aussie, British, Czech and Polish defenders - the men who Nazi propagandist Lord Haw Haw will describe as rats - run for cover. By the sound of the engines, a pasting is on its way!

Above the dive bombers preparing to....er....dive bomb, the BF110s go first in the game turn. The Wingman Step is skipped as there is no target. The leader decides to climb, discarding a card. He has a weak offensive hand, but wants to rob Goodman of the opportunity to dive on him and gain another card. No attack...let's see what the Italians can do. The leader draws 2 cards.

#2 Goodman's hurricane:  Goodman is not good enough. He has plenty of burst cards, but dammit, still can't close with the enemy to let loose. Maybe all of his cylinders aren't firing. In predictable fashion in this dogfight, he plays a 1B Out of the Sun and targets the German wingman. The wingman draws an attack card - no use as a response card - so takes two hits. At least that's something!  Goodman discards 1 and draws 2. 

#3. CR42s:  The wingman targets Goodman (who else?) and draws his single offensive card. It's an Out of the Sun - 1B card. He takes a shot. Goodman sighs and plays a vertical roll, to disappear from the Italian's view.  Now it's the leader's turn, but dio mio, now is not the time to have a brilliant defensive hand. He can't improve his position against the English, so discards 1 and draws 1.

#4. Stuka Element 1:  Flying over their target, the unengaged stukas can't play cards in their wingman phase. In the altitude step, they do what stukas do....DIVE!.....ONE BIG SCREAMING STUKA DIVE. (If you have seen Chris Nolan's Dunkirk film, you know what I mean....take cover!!) They dive to very low altitude, but in this situation, the leader does not draw a card. 

For this 'over the target' turn, we now enter the Air Strike step. Screaming in, the stukas unload their bombs on to the reinforced defensive positions below.  Each stuka draws 3 cards: 1 for their bomb rating + 2 for a 'very low' altitude attack.

The results:  

LDR = 1 direct, 1 hit, 1 miss
Wingman = 1 vital, 1 direct, 1 miss

Tobruk is a fortified target, so the results have to be downgraded to 2 hits and 1 direct hit. Still deadly. 

But the stukas may not have it all their way. The flak guns are in a frenzy. The Scottish gunners are fired up. For this Ground Forces mission (3A), the flak get 1 +1 for targets at this altitude. This means that two Allied flak cards will be drawn against each stuka. 

The leader's first card is an In My Sights: a potential single hit. The pilot has a choice: take it or play a response card to avoid the flak. Only one such card can be played in response to flak by each aircraft, and the decision must be made before any other flak card is drawn. Well, he only has a Full Throttle card, which can't be used when you're loaded up, so the flak scores a hit. Luckily for him, the second card is a miss. 

Here, you can see the 3 bomb cards drawn beneath each stuka, showing the results in the bottom right hand corner of each card. The two flak cards for the stuka leader have also been drawn:  IMS (scoring a hit) and a Maneuver (miss). The flak cards for the wingman are face down, about to be revealed one by one.


The wingman is next, and emerges unscathed through the curtain of flak.

No cards may be played during the leader step. He then discards 2 and draws 1.

#5 Stuka Element 2:  now the other pair of stukas takes its turn, in identical conditions. The bombs fly to their target, scoring:

LDR = 3 hits
Wingman = 2 direct hits.

After adjustment for their fortified target, they score 2 hits. 
The Scots are still going crazy, pumping shells into the sky. 

The German leader draws the first card - a miss. The second is an In My Sights (IMS), but the pilot pulls off a barrel roll and avoids it. As he did not score any hits anyway, his desperate roll does not rob him of a bomb hit. 

The wingman's first card is also an IMS, scoring 2 hits. He decides to take the hits, rather than draw his single defensive card...it may come in handy for that 2nd flak card. He's right! The second card is another IMS. The wingman draws his defensive card. It's a barrel roll!  Lucky guy...he avoids a cockpit hit, but loses one of his bomb hits. now scoring a single hit.

The leader step is skipped.  Discard one, draw one.

Here is the outcome of the bombing run by the final stuka element:


The stukas would normally have the opportunity to also strafe the target, but as it is fortified, strafing is not allowed.

Final Step:  Area flak now occurs, but as area flak is rated zero for this mission and target aircraft are at very low altitude, no area flak cards are drawn. The fighters rejoin the bombers, all at neutral. 

Consulting the mission card, after scoring a total of 3 hits and 1 direct hit, the Axis has scored 3VP and DISRUPTED Allied ground forces.

There are now only two game turns left before the Axis planes return to base......is Goodman finally going to live up to his reputation?


Monday, 12 February 2018

Wild Blue Yonder: Solo play of a mission from the Rommel Attacks land campaign - 1 TURN TO TARGET

NB: if this is your first visit to this series of reports concerning Mission 6, don't read this account now, but scroll down to read the first instalment (3 Turns to Target).

This is the final turn before the Axis strike force arrives over its target. Time is running out fast for the Brits to take a chunk out of the bombers before their payloads come tumbling down over the heads of the stubborn defenders of Tobruk.

#1 The Bf110s. Sensing vulnerability, the German wingman targets his hurricane counterpart. He draws his one offensive card: a 1B In My Sights. Attack!  The hurricane pilots draws two cards...both are attack cards. Noooooooooo!! His plane takes a peppering....enough to reach his damage level and flip the card. That's what happens when you leave your rabbit lucky charm back at the barracks.

The Germans have no reason to change altitude. The leader can sense another kill and also targets the hapless wingman, who can now only draw a single defence card.  The leader has a 3 Burst card and two maneuver cards. He goes in for the attack:

* He plays a maneuver card
* The British wingman has only one chance...it's a tight turn.
* The German pilot counters with.....a tight turn!


* It's all over....the German plays his second maneuver card, so now has enough burst points to open fire. His Out of the Sun card delivers four hits....enough to send the wingman spiralling to the ground, out of control. A ball of black smoke rises into the bright sky........

The German draws 3 cards....one more damned Englander to finish off before lunch.

#2 The Lone Hurricane: Goodman can't afford to grieve the loss of his wingman. That will have to wait until he returns to base...IF he returns to base. Alas, still lacking the cards to support an attack that will make a difference, he decides to climb to medium altitude and rebuild his hand (discard 1, draw 2).

#3 CR42s:  There is now no target for the wingman. The Italian leader has a weak offensive hand, but elects to climb, discarding a card. No attack - draws 1.

#4 & 5 Stukas:  hold position, content to approach the target.

In the Final Step, all of the fighters break off. For this mission against ground targets, the area flak level is zero. There is no modification to this at 'Low' altitude for dive bombers, so no cards are drawn to determine damage. The stukas now commence their bombing run, while Goodman and his adversaries duke it out above them......

The next instalment in Mission 6 is coming soon.......


Saturday, 10 February 2018

Wild Blue Yonder: Solo play of a mission from the Rommel Attacks land campaign - 2 TURNS TO TARGET

NB: if this is your first visit to this series of accounts concerning Mission 6, don't read this account now, but scroll down to read the first instalment (3 Turns to Target).
So, it's 'Turn 2', but in mission terms, think of it as '2 turns to target'.

Here is an overview of the situation:


Neither side scored a single hit in the first turn. The hurricanes and the CR42s are at medium altitude, while the remainder of the Axis strike force is below them. The turn gets underway, one element at a time.

#1: The Bf110s. The wingman step is skipped as no enemy aircraft share their altitude. The leader only has 3 cards in his hand, so rather than attempt to engage with the hurricanes, he decides to hold position and bide his time. He draws a card.

#2: Hurricanes.  The wingman decides to attempt an attack against the Italian CR42 wingman and draws his one offensive card. It's a blue response card:  no attack. The leader decides to dive to 'Low' altitude and attempt another attack on the Stukas. Hopefully this time he can do some damage.  Diving, the leader draws an additional card.

Poor Goodman - again, all he has to work with is a 1B burst card. He targets a stuka wingman. There is no intervention attempt by the escorting Italians as the British have not improved their attack position, and decide not to invite a preemptive intervention.

Goodman lets loose another short burst from his cannons....


......and this time, the stuka is unable to avoid his bullets, taking one hit.  (In game terms, the stuka wingman can draw a single defensive card, resulting in a 2B - useless in defence).

Goodman is getting frustrated....every second, the Axis planes are a little nearer to the target zone. He's got to be doing better than this!

#3 CR42s: The wingman step is skipped as there are no targets at his altitude. Logically enough, the Italian leader dives, followed by his wingman, and draws a card. Emboldened by the acceleration of his nimble aircraft, the leader chooses to attack the British wingman.   He plays a 'Maneuver' card. The hurricane wingman draws two defensive cards.


Oh no.....! Neither of them are defence/response cards. Caught unawares, bullets from the CR42s guns tear through the skin of his aircraft, inflicting 2 hits. Notch one up for the Italians!

#4 and #5 Stukas:  Satisfied that their escort is handling the meddlesome hurricanes, the bombers maintain course, altitude and speed.  That's the end of the turn, and there's only one more to go before they reach their target...!


Friday, 9 February 2018

Wild Blue Yonder: Solo play of a mission from the Rommel Attacks land campaign - 3 TURNS TO TARGET

I recently purchased a copy of Wild Blue Yonder, which announces GMT's long belated return to its classic Down in Flames series.

After having a blast playing some dogfights with 3 and 4 other players at the local gaming club, I decided to fool around with the Campaign rules.  Herewith, is my 3rd mission and after setting up what appears to be a fascinating duel, I've decided to serialise each turn of it.

Read on to find out if a British air ace and his wingman can stop a powerful Axis bombing mission from unleashing hell on to the defenders of Tobruk!

Mission 6 of Stage 2 has been drawn: 4 x Stukas are tasked with bombing fortified positions at Tobruk. There are 3 turns to reaching the target, then two more turns to return to base.

The German side secretly selects escort resources, comprising 2 x FW110s and 2 x Italian CR40s.

Opposing them are two Hurricanes, After drawing cards for pilots, the Axis don’t gain anything additional, but the British leader scores veteran and air ace Goodman, allowing associated chits to be placed on his card that convey one-time use advantages.

Here's the set up, sans altitudes and bomb loads:


Due to the light bombers, the Axis elements need to select and declare their altitudes, before the British. After consideration, the Germans opt to have their Stukas at medium altitude, alongside escorting Bf110s. Above them, the Italian CR42s keep watch, intending to gain a card as they dive on any British foolish enough to engage the strike force.

The British decide to come in at medium, hoping to quickly get among the Stukas and blow them out of the sky!

The Axis wins the toss to see who goes first. Not so plain and simple for the Brits after all.

So, here commences TURN ONE.........

ELEMENT #1: The BF110 leader has a good offensive hand…..so this element goes first. The wingman step is skipped for the first element on Turn 1, so, maintaining altitude, the German leader decides to try and engage the British leader.

The German pilot plays: manoeuvre.
The British response is…….nothing.
The German aircraft is now advantaged over Goodman. He can now deliver up to 2 bursts.
The German pilot attempts another manoeuvre.
Appropriately enough, Goodman plays an Ace Pilot card!
The German has nothing in reply, so is unable to tail the hurricane.
Unfortunately for Fritz, he has no burst cards. The attack is over for now.
He discards and draws.

Here's a snapshot of the above action:


#2: Now, it’s time for the hurricanes to play their turn.

The British wingman targets the Bf110 that is engaged with his leader. Handily, he is able to manoeuvre, but the German aircraft counters with a tight turn.

Altitude step….the British dive, Goodman drawing an additional card. The advantaged Bf110 is having none of it, and discards and draws to follow his prey.

Which is exactly what the cunning Goodman has been hoping for. He puts his aircraft into a Vertical Roll, climbing (discarding a card). The dismayed German pilot can only follow if he discards 3 cards – his entire hand! He decides not to follow.


Goodman smiles in triumph. There’s now nothing standing in his way from engaging his main quarry: the Stukas! Their escorts have evaporated. But his glee is shortlived: he does not have any cards that can improve his position. All he can do is use his single ‘one burst’ attack card. For this reason, he decides to target one of the German wingmen, who can only draw a single defensive card. Goodman lets off a burst, only to see the bullets stream wide of his target as the stuka performs a barrel roll. Curses!

Goodman gets off a burst aiming for the cockpit, but the stuka evades it with a barrel roll!

There nothing for it, but to keep hold of his cards and draw 2 more.

#3: Watching the drama that has just been played out below, the Italian CR42’s decide to kick into action. There is no wingman step as the Italians are along at ‘high’ altitude. They promptly dive, the leader drawing an extra card. With the exception of the Bf110s, all elements are now at medium altitude.

The CR42 leader may have 2 ace pilot cards, and possess the ‘Agile’ ability, but what he needs now is to close with the hurricanes and open fire (with a zero burst rating, the CR42s must improve their position in order to score hits). Foiled! All he can do is discard and draw.

#4 and #5: the Stukas. Intent on their bombing mission, the Stukas are not able to attack enemy aircraft, unless engaged with them. In the Altitude Step, the Stukas dive to ‘Low’ altitude. (I don’t take a card for them as they are not allowed to consult their cards and would only have to discard one in the draw step…not sure if this is correct, but seems logical).

Diving is not only preparation for their approaching bombing run, but allows them to be re-united with their Bf110 escorts.

That concludes Turn 1 of the Mission. No hits by either side!

Stay tuned for the next instalment of ‘Death in Libyan Skies......’ 

Saturday, 10 June 2017

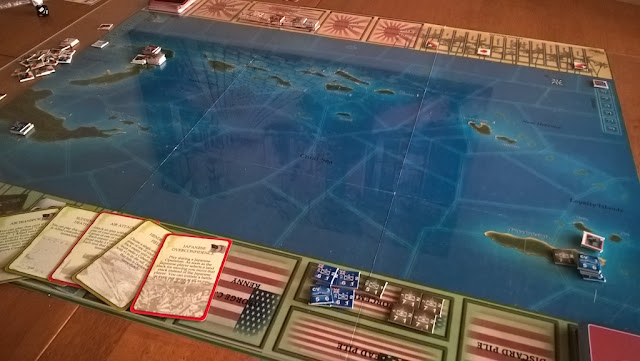
A First Face to Face Game of Coral Sea

A couple of weeks ago, Roger and I enjoyed spending the afternoon giving Coral Sea its first f2f tryout. I played the Japanese.

My initial hand draw was poor on Resource Points (RPs), but rich in reinforcements. In fact, after the first couple of card draws, I also had the 2 Truk fleet cards in my hand. Not bad at all.

It seemed to me that the imperative was to get a force on to Guadalcanal as soon as possible and construct an airbase before the Allies could show up. Within several turns, this was accomplished, with the Japanese also dropping forces on to New Ireland enroute. In retrospect, I think I took too much liberty in landing multiple land units from a single stack/task force...in contravention of the somewhat laboured sea transport rules (a key gripe here....I think those rules need simplifying/clarifying).

Anyway, the game seemed to be unfurling in accordance with the historical narrative....and this was shortly reinforced when a US stack turned up off Guadalcanal and landed several land units, kicking the Japs out of their newly established airfield:

Here you can see the result of our first land-based battle, with the US spending an RP to activate the zone off Guadalcanal (with the shipping marker). While the Japs managed to repel most of the US marines, they themselves were forced to retreat to the western half of the island, leaving a single marines regiment in command of their newly dubbed Henderson Field. Cut off and disorganised, the Japanese troops have been marked out of supply. All battles in this game are conducted by each side placing relevant chits into a cup, then drawing a number of them in accordance with their units' highest tactical value. We then alternate the playing of chits. This can be quite a lengthy process, but it can also be fun. It's extremely difficult in this game to actually eliminate a naval unit, as a single disorganised result forces a selected unit to return to the closest base. Only through delivering a simultaneous disorganised + depleted result to an already depleted naval unit, can it be destroyed. As it happened, the Japanese succeeded in destroying one Allied carrier counter.  Not bad going!

Shortly thereafter, the game departed from the historical script. The Japanese returned in force and were able to land sufficient reinforcements on Guadalcanal, to boot the Americans back into the ocean.

At about this time, the Japanese were also able to send two small task forces to the northern coast of New Guinea, landing ground units and shortly thereafter, constructing an airfield south of Lae: enabling airstrikes to reach Port Moresby.  The Allies tried to send a ground force across the Owen Stanley Ranges separating the northern coast from Moresby, but soon discovered that moving land forces through the jungle exacts a heavy toll on units (moving from one land zone to another depletes, or flips, each unit). As only a single depleted unit can be re-built for each RP spent, it's an expensive and slow exercise  to attempt an overland advance. As per history, sailing around the island transporting land forces soon became  the preferred option.

This is how the situation appeared shortly after the Jap landings on the northern coast of New Guinea:


The next thing I sought to do was extend Japanese control out of Guadalcanal to Esperitu Santu, and to complete the conquest of island between Rabaul and Guadalcanal. Soon after landing a small force on Santu though, another Allied taskforce turned up to try and seize the island back. A battle ensued and the Japanese naval and ground forces narrowly persevered, sending the Allies scurrying back to New Caledonia. As soon as feasible though, they were back.....and in greater force. The short Japanese dominion of Esperitu Santu came to swift end.

The final operation of the game centred on the Allies sending a naval task force with troop transports around the eastern coast of New Guinea, intent on landing at Buna and Lae to expel the Japs from the island. Battle chaos soon ensued:


Under intense Allied pressure, the Japs were able to deliver additional land units to the coast north of Lae, just in time to counter-attack and drive Allied ground troops back on to their landing ships. Pretty fiddling dealing with these massive stacks of units and their status counters!

Not long after this, the game came to a close as I drew the final card from the Japanese deck. The final score, based on map objectives and losses:  a Japanese victory, 30 points to 19.

An enjoyable game, though some of the ambiguities in the exclusive rules in particular, can lead to some interpretation headaches. We're going to play this again and be more rigorous re the sea transport rules....which will no doubt force the Japanese to be even more careful in their spend of each valuable resource point.

My impression is that this is a pretty good game and deserves to be re-published, overhauling some of the rules and modifying the game engine in a way that would strengthen the fog of war potential so that the uncertainty surrounding each thrust and counter-thrust could be further enhanced. I salute the game's Spanish designers!

There really should be more games done on the Battle of the Coral Sea......and I feel that gaming companies missed an opportunity by not releasing a game in time for the recent 75th anniversary of the Battle.

Sunday, 14 May 2017

On the Table - Coral Sea

I've had this game for at least 5 years, but never got around to trying it out. However, noting that this month is the 75 anniversary of the Battle of the Coral Sea, NOW is the perfect time to dust it off and try this quite highly rated (7.1, BGG) game out for myself. The game was produced back in 2010 by Spanish publisher Bellica Third Generation.

The game looks great and has some innovative mechanics, including simultaneous reveal of chits to determine if a player decides to conduct a map operation or perform some kind of card play. Chits are also drawn during land or naval combat, with they type of chits available to each side dependent upon the type of assets (eg air, naval) committed to the battle.

Here a shot of the game, set up and ready to play.......


 ....and a closer shot of Japanese forces and resources that start at Rabaul:


More on this one later..........I'm going to play it f2f with local gaming buddy Roger, then follow up with another game using the Vassal module.

Saturday, 6 May 2017

On the Table......Fighting Formations

A number of weeks have transpired since my last entry. In that time, a few games have hit my table. Most notably, has been several scenarios of Chad Jensen's WWII tactical game, Fighting Formations.
This game focuses on the experience of the Gross Deutschland division on the Eastern Front.

Over a number of weeks, local gaming buddy Jono and I played the tutorial, Scenario 1 and Scenario 4.  Here's a screenshot taken during Scenario 4, in which a German force comprising Pioneers and StugIIIs attempts to seize key objectives along a fortified Soviet defensive line:


As you can see from the above picture, the Soviets have a pretty formidable line, comprising pillboxes, entrenchments, mines and wire. Some remain unrevealed, represented by sighting markers. If the Germans enter their actual or adjacent hex, or score a hit on the hex, then these markers are revealed...possibly more of the above defences or a false sighting.  The red rimmed hexagons show the location of key objective hexes.

The situation in the above picture is that German armour platoons are testing the Soviet defensive emplacements. They had been careful to reveal sighting markers from at least a 2-hex distance in case they were mines (which, on being revealed, can be placed in an adjacent hex - simulating a unit blundering into a minefield). Meanwhile, a Soviet fighter bomber has dealt some damage to pioneers working their way up the slope before the defensive line.

You can see a round Soviet command marker in the pillbox hex. As this is currently showing its '1' setting, it can activate units within its command radius (2 for the Sovs) for the cost of 1 initiative point per unit.

I'm not going to write a review of this game, but to make some general remarks about it....and why Jono and I decided, after playing 3 games, to put it aside.

Being fans of Combat Commander, we were well primed to enjoy this game - and indeed, were attracted by the opportunity to play a system including tanks and other types of vehicles. We were also attracted by the matrix system in the game, allowing cubes to be selected for various points of initiative cost, to issue different types of orders. One of my bug bears with Combat Commander is the degree to which you depend on the cards in your hand for even issuing simple orders such as Fire and Move. This can be very frustrating. So, the matrix system was a winner.

The sighting marker system is also great in Fighting Formations. Some can reveal hidden units (kept off-board) and their use give recce units far more importance. We really liked the use of chit pulls for dealing out damage as well (such as the orange and red chits in the above image). Thumbs up too for the system of command activation and the use of return fire and rate of fire rules. The use of asset cards is great too.

All of that was good and we liked the look of the game. Sadly though, what soured the game for us was a feeling that the system got in the way of game play. The biggest gripe was the degree of time required to handle all of the mechanics associated with multi-unit combat. It's very time consuming and you have to constantly be referencing the modes of fire and various drms affecting the choice of dice to be used for offensive and defensive fire.  We had hoped for a more fluid gaming experience, but even into our 3rd game - and being more familiar with the rule-set and mechanics - the grind of working our way through various routines robbed us somewhat of actually enjoying the experience.

Even these larger than normal hexes can become very messy too, with lots of counters crammed or piled on to them. Some of the counters, esp vehicles, should have been smaller.

As a result, game play is usually quite slow and - in the heat of combat - can become tedious.

So, our hunt for a fun yet reasonable tactical simulation of WWII combined arms combat continues. The Band of Brothers series from Worthington Game is probably going to be our next try out.


Friday, 6 January 2017

Crackerjack Combat Commander session


I recently hooked up with local gaming buddy Steve for a game of Combat Commander. For our face to face session, I chose scenario 80 from Battle Pack 5: Fall of the West. Entitled Bitter Isthmus, this one has French and German recon forces clash head on near Montherme, France in May 1940.

As the Germans, I set up first - threatening to quickly seize the middle ground. But the French decided to be assertive and use their ability to move first in the scenario to their advantage, getting the jump on the Germans and seizing the strategic centre point themselves. The Germans were soon on their knees, and I thought that this would be a quick scenario!

Instead, what followed for the next 3 hours saw the pendulum of battle swing back and forth repeatedly. An interesting special rule meant that each time a Time advance was triggered, we would both roll to see who would become defender or attacker (with associated changes in card hand size). This resulted in the Germans becoming defender for much of the scenario, earning a VP each time the turn number was advanced.

The picture shows the status in the centre as the game went down to the wire. The VP result at this time, was only +1 to the Germans. The results of Dig In actions played by both sides during the game can be also clearly seen.

In the course of the game, the French succeeded in eliminating several German squads, a HMG & team, and two leaders, especially through the use of a well co-ordinated Fire and Advance combination, assisted with two 'Ambush' actions (ouch!). Yet the Germans had some success too, knocking out a couple of French squads and a leader, and seizing the central objective (#5).

The Germans were only two losses away from surrender, while the Turn marker had already exceeded the Sudden Death marker once. After Steve's HMG team and squad under Lt Serrault had almost wiped out the German defenders in 'Objective 4' hex J4 (resulting in a single broken German team hanging on), Steve lined up to fire his Chasseur squad from hex I6, intent on wiping out the broken German team. This would leave him free to then seize the objective shortly thereafter.

Just as he made his fire roll, he drew a 'Time' card. Rather than use his Initiative card, to force a re-roll, he decided to stick it out and risk a Sudden Death roll. He failed the roll and passed the Initiative card to me....then succeeded in his subsequent roll. I passed the card back to him to force a re-roll. I think we did this a couple of times, but ultimately the game came to a sudden end, before the French could seize Objective 4....and claim the game. Objective 4 was worth 1VP as an open objective, but once the game ended, I revealed the German secret objective...awarding 4 more VP to Objective 4!

The result: a narrow German win.....and a dramatic end to a fine evening of CC gaming!!

Wednesday, 6 July 2016

MY CURRENT TOP FIVE WARGAMES: #5

Having indulged in this hobby for many years, I have encountered games along the way that have become 'keepers'. This is usually because I've had a terrific time playing them and have come to admire the way they have been designed, together with their re-playability.


So, without further ado.....here they are:


#5: FAB: THE BULGE (2008)


Designed by Rick Young and published by GMT, this is a cracker of a simulation of 1944's Battle of the Bulge. No wargamer's collection can pass muster unless it has at least one Bulge game....and if you are seeking to address that deficiency, you can do much worse than this title. The 'FAB' in the title stands for 'Fast Action Battles'. I think 'Fast' is a little too optimistic as the game system can become quite involved. That said, I found it to be logical and intuitive. The game system just feels right.

I really like the way in which divisional units are represented by blocks, while assets - including artillery, engineers, air support and specialist formations - are represented by counters. Available assets can be allocated to battles (designated by areas) and can influence the outcome. Each turn, a certain number of assets - both returned to available and newly arriving as per the reinforcement chart - are put into a cup and drawn. This means you are never really sure as to what assets will be available. Also included among the assets are replacement and event chits. Many of these allow the player to restore depleted units. Others tie in with historical elements in play during the battle. An example here - available to the Axis player - are the Greif team units that can be used to sow confusion behind Allied lines and stymie Allied attempts to blow bridges.

Here are examples of the available chits, taken from the pre-punched counter sheet:


Each player also has a single Special Action block that can be used each turn to carry out a range of special commands. This block represents direct intervention from your Staff HQ. Among its uses are granting additional replacements, retreating before a combat and conducting a breakthrough combat. While this block can be used once each turn, additional Special Action chits can be drawn from the cup for a single-time use.

A clever aspect of the combat system in this game is that the attacker can choose to abort a battle if the consequences of following through will get ugly. The assets have been spent, but the units can pull back to fight another day. Combat also uses Base Success Numbers (which in this case is 5), which are modified up or down by factors such as defensive terrain, use of armour, troop quality and the type of point unit designated by each side.

Overall, I think this is an excellent operational-level system that lends itself brilliantly to a mobile battle such as the Bulge. The FAB system has so far spawned additional titles, such as FAB: Sicily (which I also own but consider too much of a slug fest to really showcase the FAB system) and FAB: Golan, which has recently been released. I look forward to playing this title.

I highly recommend this game.....and system.

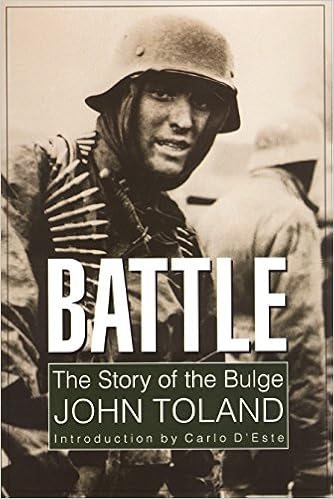
While learning up and playing this game, I also enjoyed reading:


Originally published as The Battle of the Bulge by John Toland in 1959, what this book may lack in the depth of its scholarly analysis, is more than made up for by being an energetic, page-turning history of the battle. I just wish it had decent maps! Perhaps later editions attended to this, as I bought a second-hand copy of the 1998 Wordsworth Military Library edition. One of the most fascinating aspects of the battle that I discovered from reading this book, was the sheer lengths the Germans went to, to disguise their preparations and planning for the 'Wacht am Rhein' offensive.